Copping Some Style

(Originally drafted in November 2019 during my tenure at Xero. Republished here in February 2024 with updated context and removed proprietary references)
In a commercial environment, all documents (both internal and external) tend to follow a templated format: presentation decks, internal documents, email footers and internal systems, to name a few – even the software we produce tends to follow the same UI conventions to ensure the experience for end users is consistent.
Equivalent examples of this can be found in the “real world”: have you ever opened a newspaper to find the font-size and font-style changes from page to page, the sport section is at the front and the horoscopes are on the front page? The next week the editors decide to print everything using a different layout, font-sizes and font-styles?
Me neither.
So why not find a way to standardise our code in the same way?
Why Bother?
Everyone has their own style of writing code. For personal projects, this is fine: you’ll be the only person who will be WTFing at your past self in the future.
However, in both commercial and community-based projects it’s not just you that will have to read the code. A well-known fact in software development is that developers spend most of their time reading code rather than writing code. If code is easy to read then it follows that the code is not only easier to understand but it is also easier to change, which subsequently means it’s also a lot easier to maintain in the long run.
Time is saved, thus money is saved, your sanity is saved, everybody’s happy.
The creative part of development is breaking down a problem into smaller pieces and solving the larger problem by solving each of the individual pieces. Ergo, development is about solving problems rather than wars over tabs vs spaces.
If we take coding style out of the equation then developers can focus on the things that really matter, such as solving business problems and other aspects of software development like non-functional requirements.
If you’ve worked at other software houses, people have generally tried to standardise the way code should be written through formulating lengthy Coding Standards documents.
Well, we all know how people just love reading lengthy documents. ‘Nuff said.
However, there’s also a firm belief within development circles that if you repeat the same process at least three times then there must be a way to automate said process.
Introducing StyleCop
Easy now, this isn’t going to result in the local copper coming to your desk to arrest you for that tank top you’ve been wearing all week. Nor are they going to turn up to your house at Christmas to confiscate that abysmal jumper you happen to wear at the same time every year (your secret is safe with me, I promise).
StyleCop is a tool that provides the following benefits:
- At its heart, StyleCop provides code linting, like JSHint for JavaScript, Checkstyle for Java or SwiftLint for Swift
- It used to be a Visual Studio extension that had to be run on-demand; however, this has changed now that a ReSharper extension is available
- It can be run automatically across an entire codebase or within individual files
- It can be automated as part of the build pipeline (more on that later)
- It allows you to concentrate on what the code itself is doing rather than the style of the code
Sure, there are other similar tools that can achieve the same job. However, StyleCop is different in that:
- It is 100% completely free and open source
- It can be extended with your own rules if need be
- It has been under active development for several years
- It has active support for Roslyn Code Analyzers
Who doesn’t like free stuff? Moreso free stuff that actually works and is still being actively maintained? 🙂
Show Me The Style
Like all tools, StyleCop is no silver bullet. It’s not going to fix all your problems at once and it does require some up-front time and investment to get it set up and working for you and your team.
However, the time spent can vastly outweigh the benefits in time savings you’ll get from having a much cleaner codebase that’s easier to understand and maintain.
The best way to set up StyleCop is to use it as part of ReSharper. This way you don’t have to run the tool on-demand and code is analysed in real-time as it is written. The ReSharper extension also allows you to apply quick fixes right there and then in the code.
Configuration Confusion
Before we go any further, we need to explain a little bit of history around StyleCop’s configuration system.
When StyleCop was first created, it started as a stand-alone on-demand Visual Studio extension. This extension would use a file called Settings.StyleCop which sat in the root of your solution, configured using a tool that sits in the StyleCop installation folder.
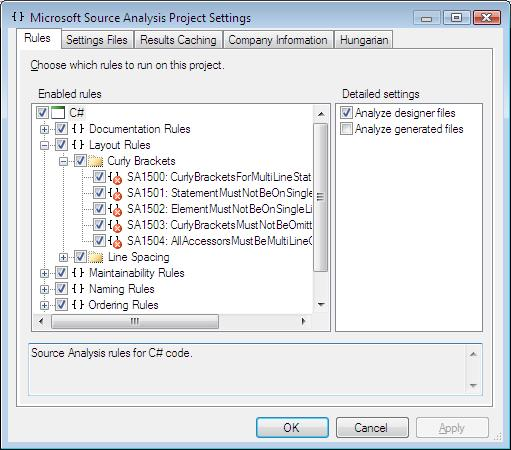
ReSharper has its own configuration system, and when the ReSharper extension came along it integrated nicely with that configuration system. ReSharper uses a configuration file with the same name as the solution but with a .sln.DotSettings extension - for example, MySolution.sln.DotSettings.
Newer versions of StyleCop (most notably the Roslyn analyzers) use a JSON file format and store their settings in a stylecop.json file. As far as I know, there is no easy way to edit this file using a tool – all changes must be performed by hand. There also appears to be no way to migrate existing settings across to this new format.
As a result there is some confusion around which file is used under which circumstances. From this we can deduce the following table:
| Tool | Filename | Has Configuration Tool? | ReSharper Extension Compatible? |
|---|---|---|---|
| StyleCop On-Demand | Settings.StyleCop | Yes | No |
| StyleCop ReSharper Extension | [Solution].sln.DotSettings | Kinda | Yes |
| StyleCop Roslyn Analyzers | stylecop.json | No | No |
Therefore, I would highly recommend using just the ReSharper extension, as it can be configured straight from the IDE and also integrates nicely with the Code Inspections step of a CI build.
Extendy McExtenderson
To install the ReSharper extension, navigate to the ‘ReSharper’ menu and select ‘Extension Manager’. When you first search for ‘StyleCop’ you will most likely find two plugins available: ‘StyleCop.ReSharper’ and ‘StyleCop by JetBrains’.
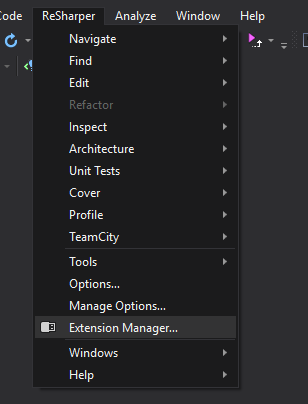
The extension you want here is: ‘StyleCop by JetBrains’.
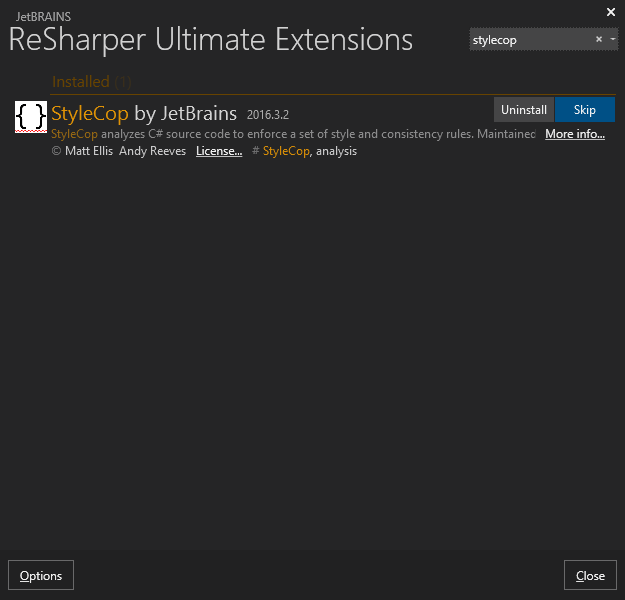
Once the extension is installed, restart Visual Studio when prompted, then navigate to the ReSharper options. Here you should find a ‘StyleCop’ section on the left-hand side and in the ‘Inspection Severity’ section under ‘C#’.
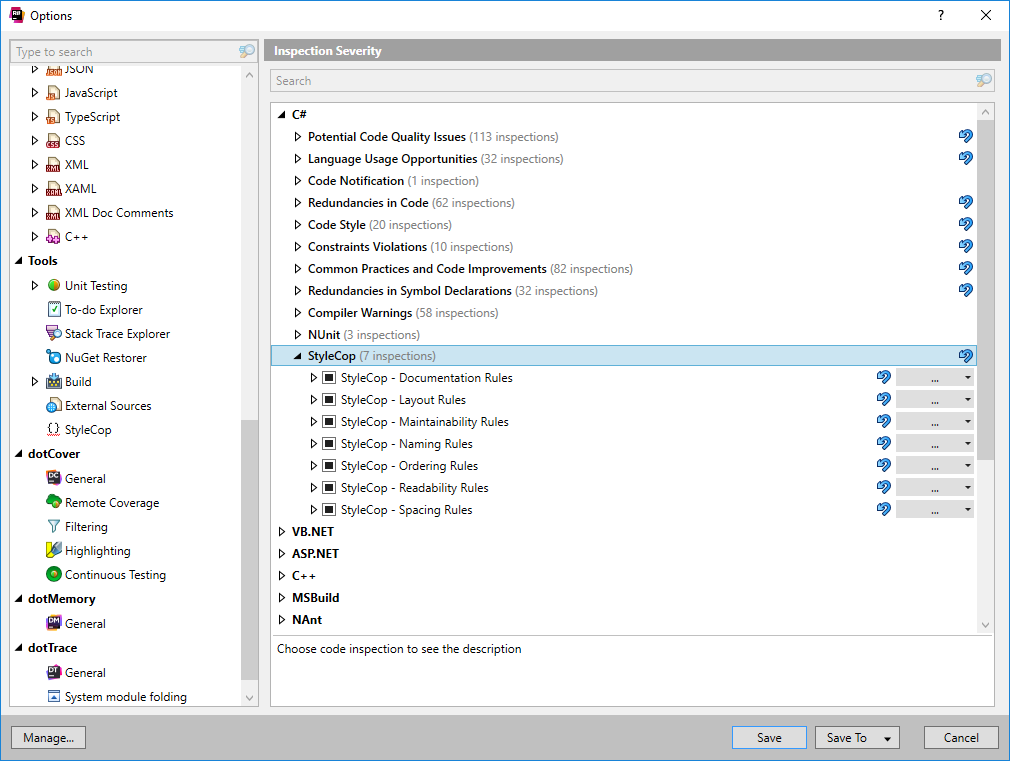
You can then test the extension by opening a code file, adding some whitespace and pressing ALT+ENTER with the cursor on the lines with violations.
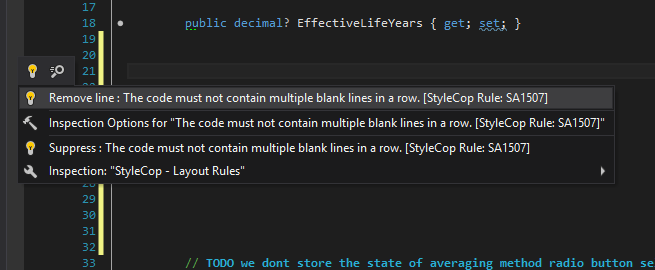
Configuring Rules
When you first install the extension it will go absolutely crazy and automatically underline pretty much every line in your codebase. Most of the time this is because of the ’this element must be documented’ rules.
These rules can easily be configured by setting a violation level for the inspection through ReSharper’s quick-fix menu: press ALT+ENTER while the cursor is on that line of code to bring up the menu. From here, select ‘Configure Inspection Severity’ and you’ll get a window where you can select whether the inspection is a hint, suggestion, warning or error.
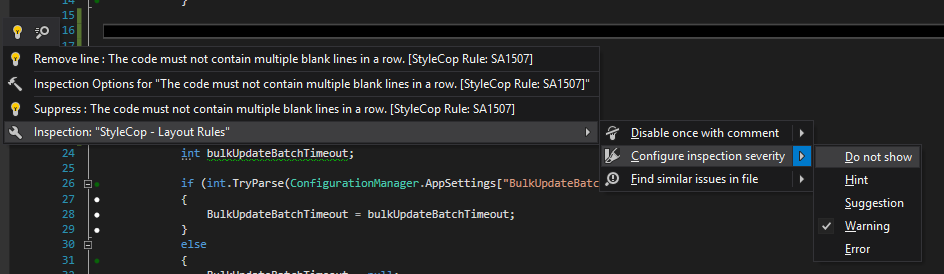
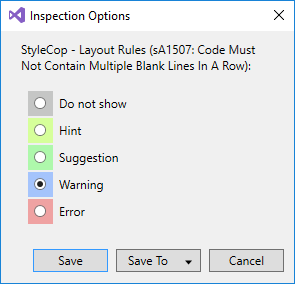
(NOTE: When saving the setting, select ‘Save To’ to save the setting to your team-shared settings – covered later in this post.)
You’ll probably find yourself spending some time fine-tuning which of StyleCop’s rules to turn on and off. A full list of the rules provided out-of-the-box can be found on the StyleCop documentation site.
A Note On Rules
One thing to note when setting up the rules is that sometimes they can conflict with ReSharper’s own rules.
A perfect example of this is the ’this’ keyword: in StyleCop you can specify that all member variables are prefixed with the ’this’ keyword. However, there is also a ReSharper inspection that states the ’this’ keyword is redundant.
This (excuse the pun) is something to be aware of as you could end up stuck in an infinite loop where one tool is fighting the other 😉
A Baseline Rule Set
Rather than starting from scratch, I’d recommend finding or creating a baseline rule set and importing it via ReSharper’s settings import feature:
- Navigate to ‘Manage Options’
- Ensure the ‘Solution “[Solution Name]” team-shared’ entry is selected
- Select ‘Import and Export’ and ‘Import from file…’, then select the
.sln.DotSettingsfile to import from - Ensure just ‘Code Inspection’ is selected and press ‘OK’
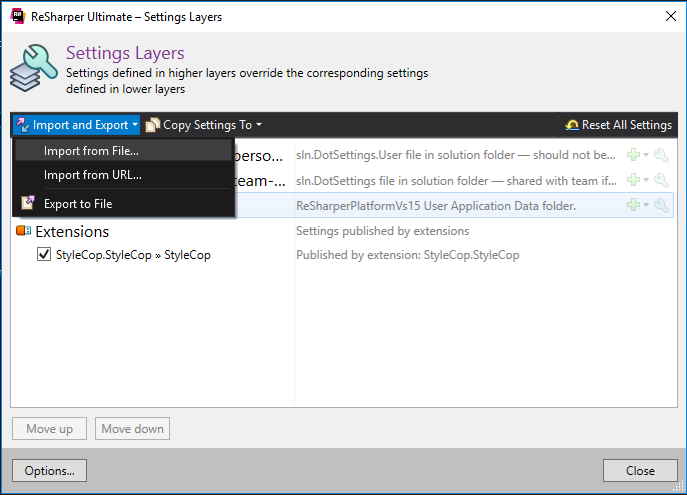
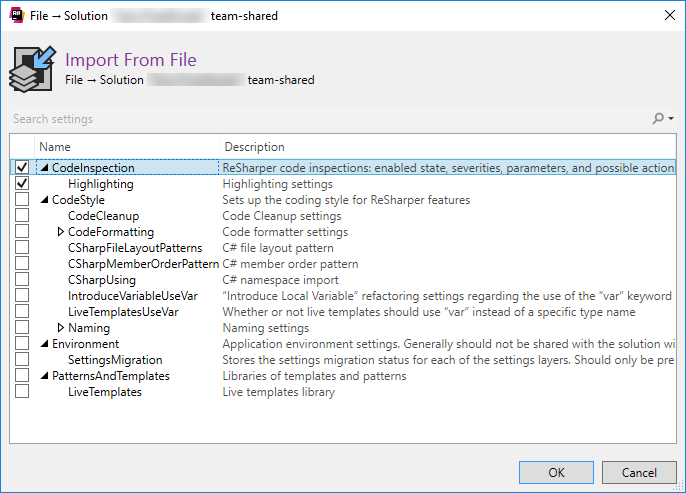
(NOTE: StyleCop inspection settings are not a separate item so this may overwrite your existing settings – be sure to take a backup first.)
Alternatively, you can simply copy the file into the root of your solution folder, giving the file the same name as the solution file. Due to the magic of ReSharper’s layered configuration system, adding the file to the root folder will automatically pick up and use those settings for that project.
My Disabled Rules
Here’s an example of the rules I’ve disabled and why:
| Rule | Description | Reason for Disabling |
|---|---|---|
| Spacing Rules | ||
| SA1027 | UseTabsCorrectly | Visual Studio uses tabs by default when indenting code |
| Readability Rules | ||
| SA1101 | PrefixLocalCallsWithThis | Conflicts with ReSharper’s “Redundant this prefix” inspection |
| SA1115 | ParameterMustFollowComma | Doesn’t play nicely with LINQ projections |
| SA1116 | SplitParametersMustStartOnLineAfterDeclaration | Method/constructor parameters don’t always go across separate lines; some constructors have only one parameter |
| SA1117 | ParametersMustBeOnSameLineOrSeparateLines | Some parameters are intentionally split across multiple lines for readability |
| SA1119 | StatementMustNotUseUnnecessaryParenthesis | Parenthesis sometimes necessary for clarity in financial calculations |
| SA1124 | DoNotUseRegions | Regions hide code (we prefer explicit visibility) |
| SA1126 | PrefixCallsCorrectly | Conflicts with ReSharper’s rule requiring base. keyword for base class calls |
| Ordering Rules | ||
| SA1200 | UsingDirectivesMustBePlacedWithinNamespace | Opinionated decision-90% of codebases place using directives at the top of files |
| SA1202 | ElementsMustBeOrderedByAccess | We follow custom element ordering; keep SA1201 (ElementsMustAppearInTheCorrectOrder) instead |
| Naming Rules | ||
| SA1303 | ConstFieldNamesMustBeginWithUpperCaseLetter | ReSharper handles naming style inspections |
| SA1304 | NonPrivateReadonlyFieldsMustBeginWithUpperCaseLetter | ReSharper handles naming style inspections |
| SA1305 | FieldNamesMustNotUseHungarianNotation | ReSharper handles naming style inspections |
| SA1306 | FieldNamesMustBeginWithLowerCaseLetter | ReSharper handles naming style inspections |
| SA1307 | AccessibleFieldsMustBeginWithUpperCaseLetter | ReSharper handles naming style inspections |
| SA1309 | FieldNamesMustNotBeginWithUnderscore | Underscore prefix convention (_camelCase) is deep-rooted in .NET Framework |
| SA1310 | FieldNamesMustNotContainUnderscore | ReSharper handles naming style inspections |
| SA1311 | StaticReadonlyFieldsMustBeginWithUpperCaseLetter | ReSharper handles naming style inspections |
| Maintainability Rules | ||
| SA1401 | FieldsMustBePrivate | Legitimate cases where fields should be accessible outside the class |
| SA1402 | FileMayOnlyContainASingleType | Files sometimes contain inner private classes or enumerations |
| Layout Rules | ||
| SA1500 | BracesForMultiLineStatementsMustNotShareLine | Sometimes conflicts with ReSharper’s LINQ query formatting |
| SA1516 | ElementsMustBeSeparatedByBlankLine | Can conflict with LINQ queries |
| Documentation Rules | ||
| SA1600–SA1602 | ElementsMustBeDocumented / PartialElementsMustBeDocumented / EnumerationItemsMustBeDocumented | Internal code should be self-documenting; not open source |
| SA1609 | PropertyDocumentationMustHaveValue | Same as above |
| SA1623 | PropertySummaryDocumentationMustMatchAccessors | Same as above |
| SA1629 | DocumentationTextMustEndWithAPeriod | Same as above |
| SA1630 | DocumentationTextMustContainWhitespace | Same as above |
| SA1632 | DocumentationTextMustMeetMinimumCharacterLength | Same as above |
| SA1633–SA1639 | FileHeader / Copyright / FileName / Summary requirements | Same as above |
| SA1640–SA1641 | FileHeaderMustHaveValidCompanyText / CompanyNameTextMustMatch | Same as above |
| SA1650 | ElementDocumentationMustBeSpelledCorrectly | Same as above |
(Note: 9 times out of 10 you can Google the ‘SA’ codes directly and you’ll find their corresponding page. The other 1 time out of 10 you’ll probably get the flight status for a South African Airways flight 😉)
Once everything is configured, be sure to add the file to source control so everyone is following the same rules. For developers that don’t have the StyleCop extension installed, the settings in the configuration file will be ignored and ReSharper will continue to function as expected.
Automated Inspecty McInspecterson
So now you’ve got everything configured to your liking, the next step is to enable this in the build.
When you have your codebase at a stage where you’ve got no (or very few) inspections being reported by ReSharper in the build, you can go one further and also run the StyleCop rules as part of that same step. This is another reason for using the ReSharper extension over the other methods of running StyleCop: you can re-use the ReSharper configuration file as part of the build.
The general idea is:
- Download the version of the ReSharper Command-Line Tools that matches your locally installed version of ReSharper, and unzip them to a folder
- Copy
StyleCop.StyleCop.nupkg(note: there is no need to unzip this file!) fromC:\Users\[Username]\AppData\Local\JetBrains\plugins - Rename the file from
.nupkgto.zip - Unzip the contents into the same directory as the ReSharper command-line tools
- Copy the
JetBrains.Platform.VisualStudio.Core.dllfile fromC:\Users\[Username]\AppData\Local\JetBrains\Installations\ReSharperPlatformVs14into the folder where all the files are located - the extension hooks into some DLLs that aren’t part of the command-line tools package by default, and without this the tool fails - Zip up all the files in the command-line tools folder into a new
.zipfile, with all files and folders in the root of the archive - For TeamCity, rename the
.zipfile to.nupkgwith a+StyleCopsuffix at the end of the filename and upload to the Tools area
You can test the InspectCode.exe command-line tool against your solution with a command similar to the following:
.\inspectcode.exe --profile="C:\Projects\MySolution\MySolution.sln.DotSettings" --no-swea --output="C:\Test.xml" -format=Xml -x="StyleCop.StyleCop" "C:\Projects\MySolution\MySolution.sln"Once the new .nupkg file has been created and uploaded to TeamCity, update the additional inspectcode.exe arguments with the following:
-x="StyleCop.StyleCop"
Be sure to add this on a new line (this took ages to figure out!), then save the configuration and run the build.
Parallel Builds
One important thing to note when running Code Inspections on a CI server is what happens with serial vs parallel builds. InspectCode.exe requires the original source code, and that code needs to be compiled. Build chains typically work by passing artifacts from one build to the next – and here lies the problem: the next build in the chain just needs the compiled code (to run the tests and deploy) and does not need the source code.
At first, I tried zipping up the source code and passing it along to the next build in the chain. This was a Bad Idea™ as zipping up thousands of .cs files took forever.
Instead, the trick is to compile the project twice: once in the ‘Code Inspections’ build and again in the ‘Build Solution’ build. Why? Because the ‘Build Solution’ build takes less time to finish than the ‘Code Inspections’ build, meaning you can run all the tests while the inspections are still running.
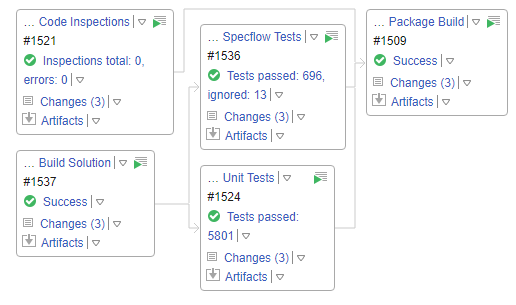
If, however, you have a serial build (i.e. all your steps are defined in one build) then you can run the code inspections right after the compilation process, as the source code is right there with the compiled files.
Being Evil (Again)
Once the Code Inspections step is set up in your build, you’ll notice that the ‘Code Inspections’ tab now lists StyleCop violations in addition to ReSharper violations. Pretty neat, huh?
This is why I recommend picking the ReSharper extension method to run StyleCop – you effectively get this code reporting ‘for free’.
Now is probably a good time to add or update the metrics for your build Failure Conditions to ensure that no additional rules are violated.
The Future of StyleCop
I haven’t tested out StyleCop’s Roslyn Analyzers as of yet, but I believe they will become the future of where StyleCop is heading. They’re very much under active development at the moment, but I don’t see an easy way of being able to integrate them with build servers yet.
Outside of StyleCop, I haven’t seen or heard of any tools that are as effective which are completely free and available for commercial use. Sure, there are paid versions of tools which achieve the same result, but in most cases these don’t integrate as well with your existing build system as ReSharper’s Code Inspections do.
As such, for now StyleCop does the job just fine and works well in ensuring a consistent style across your codebase.
Related Posts
2024-01-28