(Re)Sharpening Your Codebase

(Originally drafted in November 2017 during my tenure at Xero. Republished here in January 2024 with updated context and removed proprietary references)
If you haven’t heard of ReSharper, then you’re dead to me.
OK, so maybe my opening statement was a bit harsh. But seriously, ReSharper is awesome if you know what it’s capable of.
I’ve spent many years of my career effectively masquerading as a JetBrains salesman. I’ve used ReSharper in my C# development ever since becoming a .NET developer back in the VS2005 days (yes, yes, you can play the world’s smallest violin for me).
Sitting somewhere between annoying and awesome are ReSharper’s quick fixes. These quick fixes are detected in source code through some static-analysis-y, codedom-y, inspect-y way (yes, I just made up some words there) and have numerous benefits:
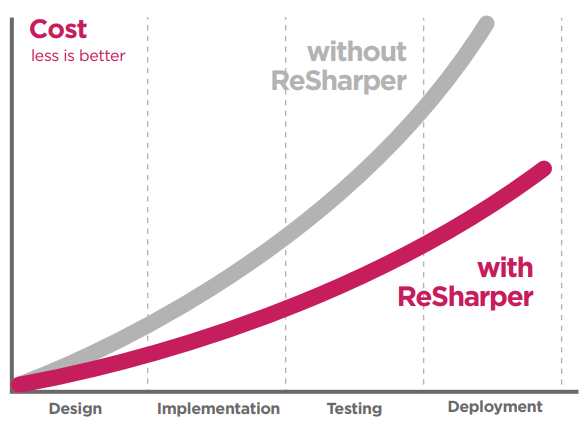
In 90% of cases, these quick fixes are valid (who doesn’t like the detection of possible NullReferenceExceptions?) and in some cases the suggestions provided are downright smart (did you know you could use this really cool LINQ query here?)
By and large, most of the code fixes ReSharper suggests are valid, and by not fixing them you could be putting more pain on yourself and your team – and potentially creating yourself *gasp* unnecessary technical debt.
Nothing annoys me more than opening a C# file and finding shedloads of these violations highlighted.

Still with me? Good stuff.
Now, if only there was some way to automate this?
Well, glad you asked! As it just so happens, JetBrains develops ReSharper. You know what else they develop?
That’s right! TeamCity! And guess what? This stuff is built-in out of the box.
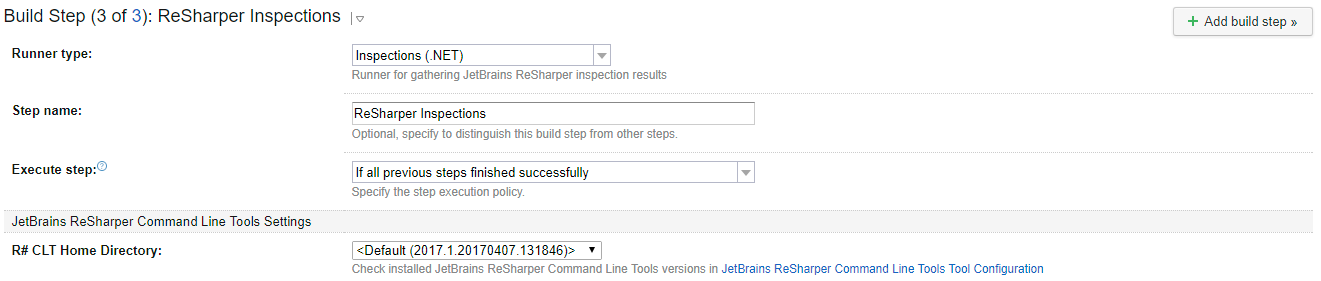
Well, why don’t we take advantage of this?
Existing Codebases
Most of the pushback stems from the fact that existing codebases have too many inspections already. That’s alright – here you have one of two options: employ the Boy Scout Rule, or go on a mass refactoring mission.
Now, I have to admit, when we started this on one codebase I worked on, we began with Plan B. Thankfully, at that particular moment in time, JetBrains saw the light and had introduced a feature into ReSharper that provided a way to apply quick fixes en masse.
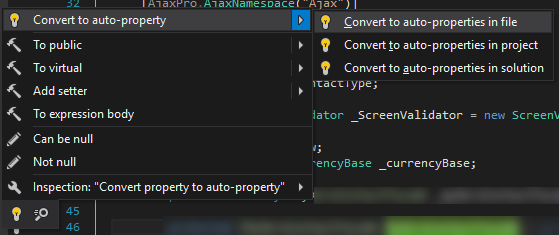
While, yes, this is an incredibly risky approach, it’s only going to ultimately result in one of three possible outcomes:
- The quick fix is applied but your code doesn’t compile.
- The quick fix is applied and your code compiles, but some or all of the tests fail.
- The quick fix is applied, your code compiles, and all your tests pass.
(However, if you don’t have any form of automated tests, then I have no words.)
Seeing the Wood for the Trees
Granted, this can take time, but if everyone on your team is committed to tidying up the code in the files that they touch, then over time you can drop these violations down one-by-one.
So, the question is: which of these violations should you fix?
Well, this is entirely up to you and your team. If there are some that you think are too overzealous in their approach, then you can disable them easily.
There are several levels of “violation” in ReSharper-land, and these include:
- Hint – Maybe you should do this, but you don’t really have to (indicated by a small underline of the first character on the line)
- Suggestion – You don’t have to do this, but we think it’s a good idea (indicated by a green squiggly underline)
- Warning – Change this, otherwise I’m gonna keep hassling you about it (indicated by a yellow squiggly underline)
- Error – What are you doing? This blatantly isn’t gonna work (indicated by a red squiggly underline)
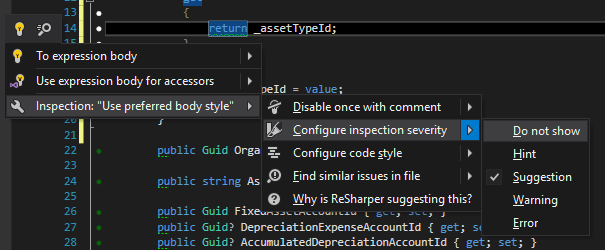
So, you can still have something be suggested but not have to be followed. This is great for those violations where you’re not too sure you like the fix in some cases, but in other scenarios it’s perfectly valid.
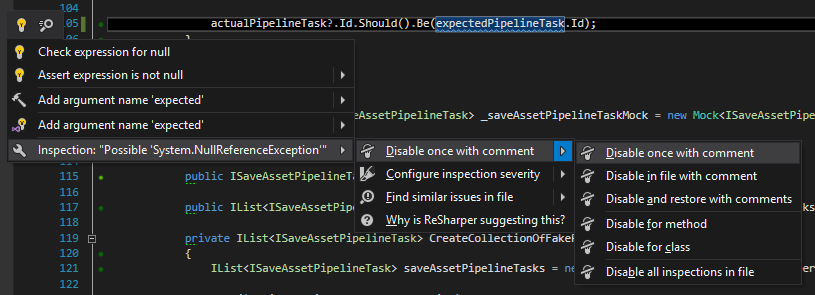
On the other hand, if you want the violation to still be active but it doesn’t apply to one particular line of code, then you can just add a comment that disables the violation for that line.

While I would strongly recommend that you don’t do this, there are cases where you just have to because… well, reasons.
(Don’t even get me started on the PotentialInvalidOperationException violation for nullables – I’ve worked on codebases with tons of these due to a massive architectural design oversight.)
Mmmm… Cake
ReSharper stores its settings using a layer system which generally comprises the following:
- Per-user project settings (local) – These are stored against the project but are for you only
- Per-project settings (team) – Change these settings and they will change for everyone else on your team
- Team settings (shared) – Customize all you like, these settings will only apply to your instance of Visual Studio
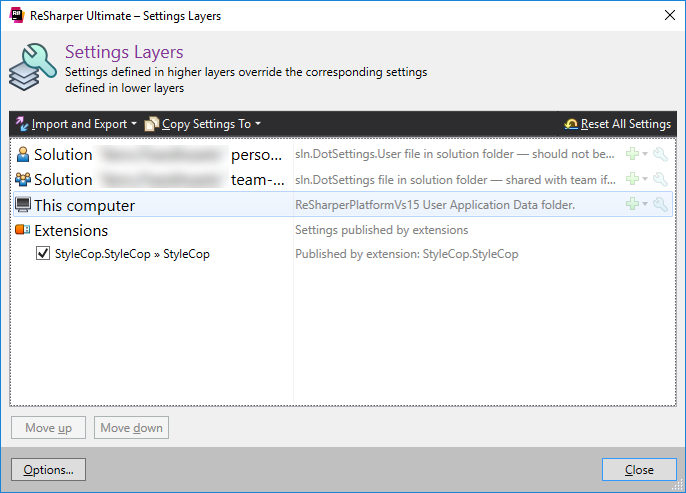
Each layer overrides the settings in the layer below (similar to how CSS overrides work), meaning the lower layers are the ones that ultimately take precedence.
To update the settings you can double-click the respective settings layer, or configure the violation level through the quick fix menu.
Naturally, you need to share these settings with the rest of the team so you’re all following the same standard, so you need to ensure the settings are saved in the bottom-most layer.
This segues nicely into our next topic…
How Do We Automate This?
Well, as mentioned above, this is already built in to TeamCity. Enabling the feature is simply a case of adding the “Inspections (.NET)” build step to your build configuration and pointing it at the shared settings file.
Now, the first time you do this I can almost guarantee you will get different results to what you see locally on your machine. This is because by default “Solution-Wide Analysis” is enabled in the build step.
The difference here is ReSharper will inspect all files and classes in those files and look at how they relate. In 90% of cases, ReSharper will highlight classes as not being instantiated. This is generally because the classes themselves are not actually instantiated through code (via the new keyword) but rather they are instantiated via a Dependency Injection container. This is because all that ReSharper is looking at is the code’s DOM through its Program Structure Interface (PSI) and not how the code is actually used at runtime.
To disable this you need to pass the following command-line parameter to InspectCode.exe:
--no-sweaYou can test this locally by downloading the ReSharper Command Line Tools and running the command for yourself.
Simply run InspectCode.exe and point it at your solution file, while also specifying the project settings file as an additional argument:
.\inspectcode.exe --profile="C:\Projects\MyProject\src\MySolution.sln.DotSettings" --no-swea --output="C:\Test.xml" -format=Xml "C:\Projects\MyProject\src\MySolution.sln"You should now see a rapid decrease in the number of violations being reported in the build.
Being Evil
By now you and your team have massively reduced the number of violations in your codebase. In fact, you’ve got everything configured as you want it and the number of violations being reported by the build is now zero.
Now what?
Now is the time to be evil: fail the build if a single violation is added to the codebase.

Yes, you will annoy people.
Yes, you will be hated.
Yes, your codebase will now forever be violation-free, now and in the future.
To do this, add a “Failure Condition” to your build configuration in TeamCity and set the relevant parameters.

If, however, you’re at the stage where your codebase still has a few violations left in it, that’s fine – just enter the number of violations you currently have. The goal here is not to have any more violations.
What About Newbies?
Not everyone who joins your team may like the suggestions that ReSharper provides. But that’s OK – it’s up to you and your team to keep those settings up to date as you see fit.
In fact, anyone who touches the codebase from this point forward will (as long as they have ReSharper installed and enabled) have the team’s settings picked up automatically due to the settings layering system.
The main thing is that this is an agreed standard, and it’s versioned and shared via source control.
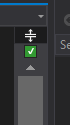
Needless to say, because the process is automated, there shouldn’t be much more to it than ensuring each file has a green tick in the upper-right corner before it is committed.
Reaching ReSharper Enlightenment
Once you’ve got your codebase at a stage where it’s nice and tidy, everyone has agreed on the rules at play and you’ve got this running as part of your build, the next thing to think about is turning on Solution-Wide Analysis.
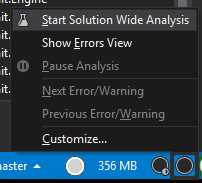
This can be enabled by right-clicking the circle in the lower-right corner of Visual Studio and selecting “Start Solution-Wide Analysis”.
Yes, yes, Solution-Wide Analysis can be a bit of a memory hog… but hear me out.
Sometimes it can be hard to find where violations are in the codebase. Mistakes are made, and by the time the file has been committed, pushed and the build has run, it is always too late. Changes have to be re-made, the files have to be re-committed, re-pushed, and the build has to run again.
Using Solution-Wide Analysis prevents this from happening as the code is always analysed as it is written. If any violations are made then they are picked up immediately. Clicking the text in the lower-right corner of the screen takes you straight to the violation so that you can fix it.

Go Forth and (Re)Sharpen!
Beyond quick fixes and code inspections, there’s a hell of a lot more that ReSharper is capable of. Most of the features that ReSharper has are not always fully realised unless you know the hotkeys available to you. As such, I would highly recommend taking a look at the Default Keymap Cheat Sheet – print it out, stick it to your monitor, refer to it when you have to.
To get you started, here are some common hotkey combinations that I personally use when writing and refactoring code:
- CTRL+SHIFT+R – The bread and butter of ReSharper. Use it when you’ve got an element selected (such as a method) and you’ll be provided with a list of quick actions that you can perform for that element. In the case of a method, you’ll be able to rename it, push it up or pull it down in the inheritance hierarchy, create an interface from the signature, and more.
- ALT+ENTER – Opens the menu for applying a quick fix right there and then. Pressing this key combination followed by the enter key will fix up the specified line.
- ALT+UP / ALT+DOWN - Navigates up and down through the code violations in the current file. Combine this with the above key combination and you can quickly fix issues in a file with god-like speed (ALT+UP, ALT+ENTER, ENTER, ALT+UP, ALT+ENTER, ENTER, etc.)
- CTRL+T – Find any (and I mean any) file, class, method, property, etc. throughout an entire codebase. You can even navigate to something by using just part of its name. For example, to find
AwesomelyRefactoredReSharperClassyou could press CTRL+T and type the characters ‘ARRSC’. Once you start using this shortcut, I can guarantee it is incredibly hard to live without it. - CTRL+CLICK – Goes to the definition of a particular element. For example, CTRL+click on a method to be taken to that method.
- CTRL+ALT+CLICK – Navigate to the implementation/declaration of an element. For example, if you’re on a base class, CTRL+ALT+CLICK the class name and you’ll be presented with a list of all classes that inherit from that class.
- ALT+SHIFT+F11 – This one requires some finger gymnastics, but is incredibly useful when you want to highlight a field/property/method’s usage throughout a file.
As with all tools, they should be used in moderation. Sure, some tools can be hard-hitting at first, but once you learn to tame their functionality, they can provide you with many benefits going forward.
So, go forth and (Re)Sharpen your codebase!